


Applying blush correctly can transform an entire makeup look, yet many people struggle to identify the ideal placement for their unique features. Professional makeup artists have spent years perfecting techniques that enhance natural beauty whilst creating dimension and warmth. Understanding where to apply this essential cosmetic product requires knowledge of facial anatomy, colour theory, and strategic application methods that professionals rely upon daily in their work with clients.
The importance of choosing the right blush
Understanding your skin’s undertones
Before determining placement, selecting the appropriate blush shade forms the foundation of successful application. Makeup artists emphasise that understanding whether you have cool, warm, or neutral undertones directly influences which colours will appear most natural on your complexion. Cool undertones typically suit pink and berry shades, whilst warm undertones complement peach and coral tones beautifully.
Texture considerations for different skin types
The formulation you choose matters as much as the colour itself. Professional artists recommend the following based on skin type:
- Powder blush for oily or combination skin, providing mattifying properties
- Cream blush for dry or mature skin, offering hydration and a dewy finish
- Gel or liquid blush for those seeking a sheer, buildable application
- Stick blush for convenience and precise application on the go
Each texture interacts differently with the skin’s surface, affecting both longevity and appearance throughout the day. The right choice ensures your blush remains fresh and vibrant rather than fading or appearing patchy.
Once you’ve identified the perfect product for your needs, understanding precisely where to place it becomes the next crucial step in achieving professional results.
The strategic areas of the face
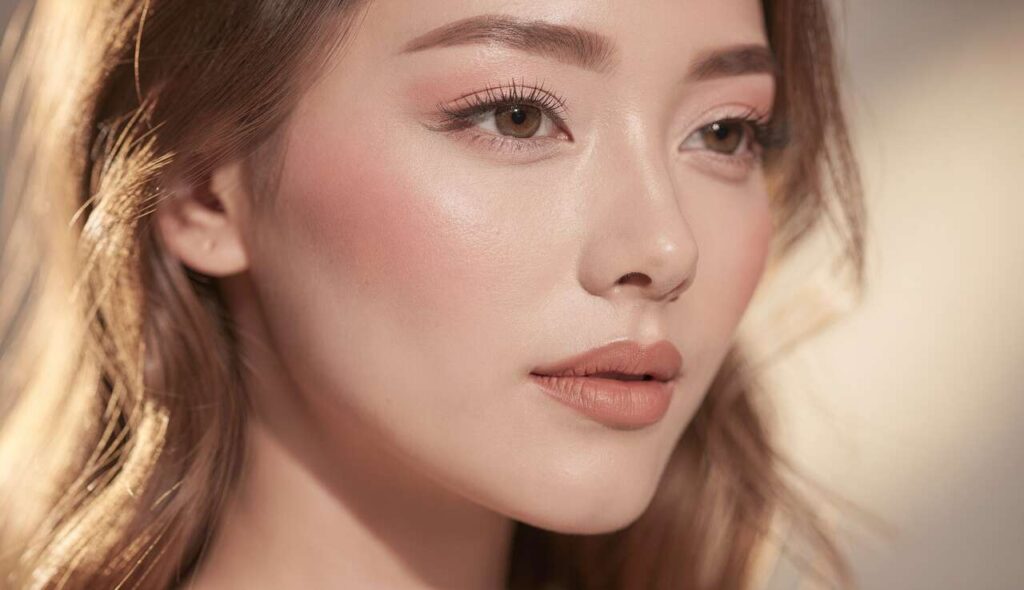
The classic apple of the cheeks
The most universally flattering placement remains the apples of the cheeks, which makeup artists identify by asking clients to smile naturally. This technique creates an instantly youthful and healthy appearance that works across various face shapes. Apply blush to the rounded area that becomes prominent when smiling, blending upwards towards the temples in a gentle sweeping motion.
The draping technique for added dimension
Professional makeup artists frequently employ a technique called draping, which involves applying blush along the cheekbones in a way that sculpts and defines facial structure. This method places colour slightly higher than traditional application, starting from the top of the ear and sweeping diagonally towards the centre of the cheek. The result mimics natural shadows whilst adding warmth and dimension.
Additional strategic placement points
Beyond the cheeks, experts sometimes apply small amounts of blush to other facial areas for a cohesive, sun-kissed effect:
- A light dusting across the bridge of the nose for a fresh, outdoorsy glow
- The temples to create harmony between cheek colour and the rest of the face
- The chin for those seeking an editorial or avant-garde aesthetic
- The eyelids when using cream formulations for a monochromatic look
These strategic zones work together to create balance, but the specific areas you choose should align with your individual facial structure and desired outcome.
Adapting technique to face shape
Customising application for oval faces
Those with oval face shapes possess naturally balanced proportions, allowing for versatile blush placement. Makeup artists suggest applying colour to the apples of the cheeks and blending upwards towards the hairline. This face shape can accommodate most techniques without requiring significant adjustments.
Techniques for round faces
For round faces, professionals focus on creating the illusion of length and definition. Apply blush in an upward diagonal line from the apples of the cheeks towards the temples, avoiding the very centre of the cheeks. This elongates the face whilst maintaining a natural appearance.
Approaches for square and heart-shaped faces
| Face Shape | Placement Strategy | Key Objective |
|---|---|---|
| Square | Apply to the apples, blending in circular motions | Soften angular jawline |
| Heart-shaped | Focus on the apples, avoiding temples | Balance wider forehead |
| Long | Apply horizontally across cheeks | Create width and proportion |
Each face shape benefits from tailored techniques that either enhance existing symmetry or create visual balance where proportions differ from the oval ideal. Understanding these nuances separates amateur application from professional results.
The colours you select work in tandem with placement to create your desired aesthetic impact.
The influence of blush shades on the final look
Natural versus dramatic colour choices
The intensity of your blush shade dramatically affects the overall impression. Soft, muted tones in peach, rose, and nude create a barely-there flush suitable for professional environments and daytime wear. Conversely, vibrant fuchsias, deep berries, and bold corals make statements appropriate for evening events or creative expression.
Seasonal colour adaptations
Professional makeup artists often adjust blush shades according to seasonal trends and natural light conditions. Spring and summer typically call for fresh peachy tones and bright pinks that complement sun-kissed skin, whilst autumn and winter suit deeper mauves, burgundies, and brick shades that harmonise with cooler weather wardrobes.
Coordinating with overall makeup palette
The relationship between blush, lip colour, and eye makeup creates cohesion in your overall look. Makeup artists recommend selecting blush shades that complement rather than compete with other products. A bold red lip pairs beautifully with subtle peachy blush, whilst dramatic eye makeup benefits from understated cheek colour that doesn’t overwhelm the face.
Beyond colour selection, the application method itself determines whether your blush appears professionally applied or amateurish.
Makeup artists’ tips for a natural effect
Building colour gradually
The cardinal rule amongst professionals remains starting with less product than you think necessary. Applying blush in thin, buildable layers prevents the dreaded clown-like appearance that results from over-application. Tap excess product from your brush before bringing it to your face, and add colour incrementally until achieving your desired intensity.
Blending techniques for seamless results
Proper blending separates professional application from amateur attempts. Makeup artists employ several key techniques:
- Use circular motions to diffuse harsh edges and create soft transitions
- Blend upwards and outwards towards the hairline for a lifted appearance
- Set cream blush with translucent powder to extend wear time
- Use a clean brush to soften any areas that appear too pigmented
Tool selection for optimal application
The implement you choose significantly impacts the final result. Professional makeup artists favour fluffy, dome-shaped brushes for powder formulations, as they distribute colour evenly whilst preventing harsh lines. For cream products, fingers often provide the warmth needed for seamless blending, though stippling brushes offer more precision for those who prefer tools.
Even with perfect technique and tools, certain common mistakes can undermine your efforts entirely.
Errors to avoid when applying blush
Placement mistakes that age the face
Applying blush too low on the cheeks creates a drooping effect that adds years to your appearance. Similarly, bringing colour too close to the nose can make the face appear wider and disrupts natural proportions. Makeup artists stress keeping blush at least two finger-widths from the nose and focusing on the upper cheek area for a youthful lift.
Colour intensity and matching errors
Using shades that clash with your natural undertones produces an artificial appearance that immediately signals poor technique. Overly orange blush on cool-toned skin or stark pink on warm undertones never appears natural. Additionally, applying too much product in a single application remains the most common error, resulting in harsh, unflattering colour that requires removal and reapplication.
Neglecting proper blending and setting
Failing to blend blush adequately leaves visible edges and uneven colour distribution. Professional artists also caution against skipping setting spray or powder, particularly with cream formulations, as this oversight leads to premature fading and transfer onto clothing. Taking the extra moment to properly set your blush ensures it remains fresh throughout the day.
Mastering blush application requires understanding the interplay between product selection, strategic placement, and face shape considerations. Professional makeup artists emphasise that the apples of the cheeks provide a universally flattering starting point, though adapting technique to individual facial structure creates truly customised results. Choosing appropriate shades for your undertones, building colour gradually, and avoiding common placement errors ensures a natural, professionally finished appearance. The difference between amateur and expert application lies in these nuanced details that transform blush from a simple cosmetic into a powerful tool for enhancing natural beauty and creating dimension.